Friday, March 21, 2014

Recipe: Skinny Baked Mozzarella Sticks


Part-skim mozzarella sticks coated with crispy seasoned breadcrumbs and baked until hot and golden. Serve them with my quick marinara sauce and you have yourself an appetizer everyone will love.

Hot mozzarella sticks, I can't think of a more popular finger food with both kids and adults alike! I mean, what's not to like? Baking them as opposed to frying and using part skim cheese doesn't effect how good these are. The cheese still melts, see for yourself!

Low-Fat-Baked-Mozzarella-Sticks

melted-mozzarella-sticks
Of course, you'll want to serve them hot right out of the oven, because like any cheese, as they cool they harden.

It actually took me several attempts to get these perfect. I played around with different brands of light string cheese to see which yielded the best results. The winner was Sargento part-skim, low-sodium. Although it's not the cheese with the least amount of fat compared to some other brands, it had the best flavor and wasn't as salty as I found some brands to be.

These are freezer friendly, in fact these MUST be frozen before you bake them or you will have one big cheesy mess in your oven! The good news is you can bread them all ahead of time then place them on tray with wax paper and freeze them until you are ready to bake. Make the marinara sauce a day ahead as well. Happy Superbowl Sunday!!

Skinny Baked Mozzarella Sticks
Servings: 12 • Serving Size: 2 pieces • Old Points: 1 pts • Points+: 2 pts*
Calories: 86.8* • Fat: 4.8 g • Protein: 7.4 g • Carb: 3.5 g • Fiber: 0.2 g • Sugar: 0.2
Sodium: 168.6 

Ingredients: 

12 sticks part-skim, reduced sodium mozzarella string cheese (Sargento)
1 large egg, beaten
2 tbsp flour
5 tbsp Italian seasoned breadcrumbs
5 tbsp panko crumbs
2 tsp parmesan cheese
1 tbsp dried parsley
olive oil cooking spray (I used my misto)

Directions:

Cut cheese in half to give you 24 pieces. Place cheese in the freezer until cheese is frozen.

Breading station
In small bowl, whisk the egg. Place the flour on another small dish. In separate bowl, combine bread crumbs, panko, parmesan cheese and dried parsley.

How-To-Make-Low-Fat-Baked-Mozzarella-Sticks
Dip the frozen sticks in flour, shaking off excess, then into the egg, then coat with the crumbs.

Homemade-Baked-Mozzarella-Sticks
How-To-Make-Baked-Mozzarella-Sticks

Repeat this process with the remaining cheese placing them on a tray with wax paper. Place cheese back into the freezer until ready to bake (this is a must or they will melt before the crumbs get golden).

When ready to bake preheat oven to 400° F. Line a baking sheet with aluminum foil and lightly spray with oil.


Place frozen cheese sticks on baking sheet. Spray the tops of the mozzarella sticks with a little more oil and bake in the bottom third of your oven until crisp, about 4 to 5 minutes. Turn and bake an additional 4 - 5 minutes watching them closely so they don't melt.

Makes 24 pieces.

Notice: There will be extra crumbs and flour after breading, I've deducted them from the nutritional info.

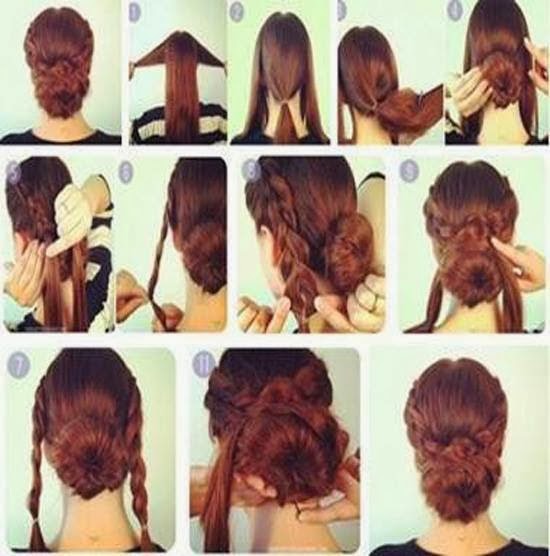
Hair Braid: Elegant Evening Braid Hairstyle


This tutorial shows a you beautiful and elegant evening hairstyle tutorial. It is perfect for both- formal and casual occasions.

Steps:

  1. Separate your hair into sections.
  2. Make a center section and tie it into a low ponytail.
  3. Back comb it as much as you can so you’ll make a fuller firmer bun.
  4. Make a bun by rolling it into itself then pin into place.
  5. French braid starting from your part, braid until the end then tie off with an elastic.
  6. Repeat on the other side.
  7. Wrap the braids around the back of your head and tuck the excess under the bun.
  8. Secure with bobby pins and add hairspray to keep everything in place.

Sunday, March 16, 2014

Accessories: Woven Bead Statement Necklace

Materials:
- seed beads (we chose two colors, but possibilities are endless!)
- jewelry thread
- 2 silver cones
- 2 silver jump rings
- silver lobster clasp
- E6000 glue
- 2 head pins

Tools:
- scissors
- 2 needle nose pliers
- jewelry needle


Instructions:

1. String seed beads onto jewelry thread. You will need four sets of three strands; two in each color. Each strand should be 30 inches long.

2. Tie strands together and tape to the table. Separate each set of three strands by color, in alternating colors.

3. Starting on the right  and moving toward the left, take grouping one and weave it over grouping two, then under grouping three and over grouping four.

4. Now take the *new* group three weave it over group two and under group one.

5. Take the *new* group two and weave it under group three and over group four.

6. Repeat steps 4 and 5 until you are at the bottom of the necklace.

7. Once you’ve reached the bottom, wrap some thread around all the seed bead strands. This will keep everything in place while you adjust the beaded strands.

8. Carefully cut the ends and release the beads below the wrapped thread. Tie these threads to one another to prevent other beads from falling off. Once all strands are cut, tie them together in one big knot.

9. Assemble the ends by inserting a head pin into the silver cone. Cut the wire and create a loop. Make two of these.

10. Attach a jump ring to one silver cone and then a jump ring and lobster clasp to the other silver cone.

11. Cut the extra thread from the necklace, add E6000 super glue and glue the end into the silver cone. Wait one hour for the glue to dry.

Restring
If you have seed beads that are already strung we suggest you re-string them. We know, it’s super annoying but the thread that the seed beads are on is very fragile and is not meant to be used in projects. By using a jewelry needle you’ll have your pieces re-strung in no time!

Weave-Me
You are going to need 12 strands of beads total, all 30 inches long. We chose two springy colors but you can use as many as you want! Section your beads into four groups of three (keeping alike colors together), then tie all the ends together. Tape your beaded bundle down to a hard surface, separate your color strands, and take a deep breath, it’s time to weave!

The weaving pattern starts on the right side—we’ll call that outermost set of teal beads “group one.” So take group one and weave it over group two (the next grey set), then under group three (the next teal set) and finally, over group four (the last grey set). Then, push up group on so that the strands are tight to the top.

Now starting on the left hand side, take the new group three (now the grey set) and weave it over the new group two and under the new group one. Push the set of strands to the top, then back over to the right hand side, where you’ll take the new group two and weave it under the new group three and over the new group four. Push the strands to the top and repeat the pattern on the opposite side so that your pattern starts to look like this. If it does, then you are doing it right ;)

Trim
Yay! You reached the bottom. Now you need to remove the extra beads. Before cutting the ends, tie some extra string around the whole bundle. Tie it tight like a tourniquet. Cut each strand to remove the unwanted beads, then tie the strands to one another to prevent extra beads from falling off. Once all the unwanted beads are gone, tie all strands together in one big knot.

Cordends
The hard part is over! Time to make cord ends. Insert the headpin into the silver cone, cut off extra wire and make a loop at the end.

Add
Attach a jump ring to one of the silver cones and a jump ring and lobster clasp to the other. Then, put the pieces together. Cut off the extra thread and put a dab of E6000 on the end of the knot. Slide the silver cone on top and wait for it to dry. We waited one hour before wearing—and yes, it was hard to resist.

Finish

Source: Brit+Co

Tuesday, March 11, 2014

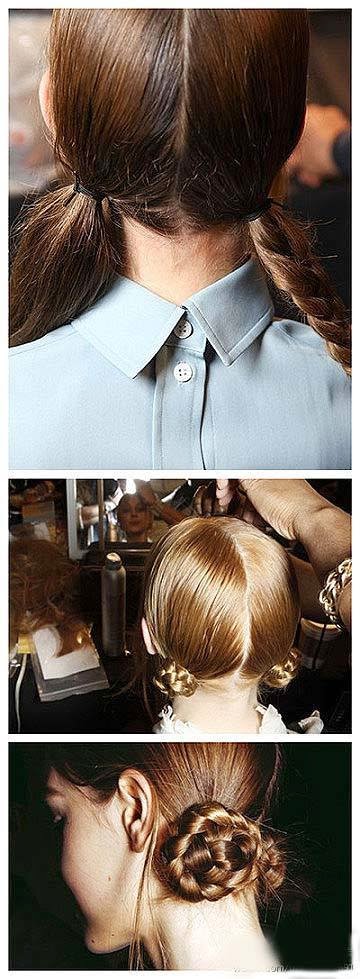
Hair Braid: Hair Braid Bun Picture Tutorial

The Braided Bow


The Braided Bun


Celtic Braid


Easy Twisty Bun


The Big Braided Bun


Not Your Average Bun


Waterfall Braided Bun


The French Fishtail Seashell Braid


Crown Braid